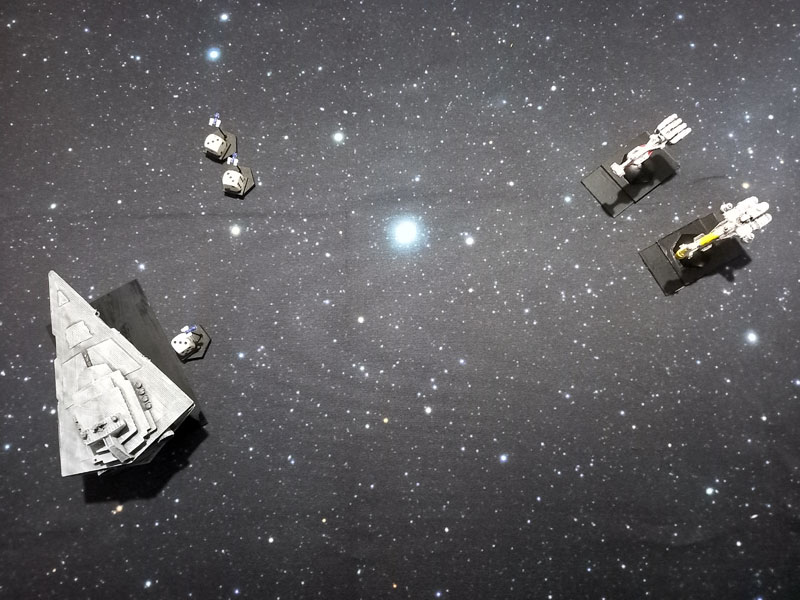
This time I was going to test three small Rebel ships against the large Star Destroyer, I was hoping that this was going to work and to be fun…
The points for this test would be interesting with the Rebels at 167 points and the Imperials at 110 points, not sure how the points will work out, I think that the points for the smaller ships either need to increase or the points for the bigger ship need to be reduced.
There will be no scenario with this game as I am still playtesting the basic working of the ships and the Command and Defence Tokens, these seem to be dominating the game at the moment so I will be trying something a little different with them this time.
So the forces are one Imperial I-Class Star Destroyer against a CR90 Corvette A, a Nebulon C Escort Frigate and a Hammerhead Scout Corvette.

Turn one turned out as I assumed it would with one or two long shots being fired from both sides but not really having any effect.
The big Star Destroyer moved forward launching fighters and it moved, these were going to be a big problem for the Rebels during this battle, the only protection they have from the fighters is their PDS.

Turn two and one of the fighter bomber squadrons moved in to attack the Nebulon Frigate, and stripped away its shields and ripped huge holes in the small ship’s hull.
The Rebel ships moved around the big Imperial ship trying to get behind and away from the big ship’s lasers.
Turn three and things were starting to look bad for the Rebels already, they were really struggling to make any impact on the big Star Destroyer.
The big ship just shrugged off the attacks from the smaller ships and turned to get in close to the Nebulon Frigate, this time opening up with its Concussion Missiles… oh that hurt, the small frigate was split in two, I am not sure any of the crew would have survived that.

Turn four and the Imperial fighters moved across to threaten the Rebel ships, burning hard to try and close the distance between them, the Rebel ships tried to keep their distance from the fighters and hit the Star Cruiser from a distance having no real effect at all.

Turn five and both of the Rebel ships used their speed and manoeuvrability to their advantage and kept behind the Star Destroyer and concentrating their firepower into the rear shields of the big ship.
It paid off as they soon stripped the shields from the Star Destroyer and were pleased to see some actual damage being done to the enemy, the Rebels needed to this more often if they had any hope of destroying the big ship.
The Star Destroyer again tried to turn into the Rebel ships to get close to be able to use its Concussion Missiles but again it couldn’t get around quick enough.
Turn six saw some great flying by the Rebels again as they moved in behind the big ship and again they stripped the big ships shields away and saw the ship take more damage.
The Star Destroyer tried again to get around to bring its main batteries to bear on the Rebel ships but again it didn’t manage to do it.
The commander on the Imperial ship ordered one of its squadrons of fighters to attack the CR90 Corvette, but the small ships PDS did well against the fast-moving fighters and took out over half of the fighters.
The remaining fighter hit the Corvettes engines but luckily the crew managed to avoid any critical damage!
Turn seven and the engineers on board the Star Destroyer didn’t manage to get the rear shields back up, this could be a problem for the Imperial ship…
But before the Rebels knew what was happening the Imperial fighters moved in to attack them again, several of the tiny fighters were destroyed by the Rebels PDS but a few got through to hit home with their attacks… and that was that, two Rebels ships spin off destroyed by the might of the Empire.


Well that didn’t go well for the Rebels, they had the Star Destroyer on the run for a short while there, but without fighter support they didn’t really stand a chance, those Imperial fighter bombers made short work of the small ships.
Right from the beginning I did think it was going to be hard for the Rebels but not as hard as that turned out to be, they struggled to do much damage until they got in close behind the big ship but the fighter bombers were too much for them.
I got a few things from that playtest though which is good, the first was the points, they didn’t work!! I will need to look at the points and see what I can come up with rather than using the points from the original game.
The Rebels would have maybe had more of a chance with two or three more ships in the fight, it still would have been a hard fight but they may have been able to get more shots into the rear of the big ship while its shields were down.
As it was the Rebels did eight hull damage compared to the Imperial side doing twenty points of hull damage!!!
The other thing is that without any fighters on the Rebels side they were going to struggle against those Imperial fighter bombers, the small ships PDS just couldn’t cope with them all, I know my awful dice rolling didn’t help but even so the Rebels definitely needed normal fighters to at least take out the enemy fighter bombers.
The Imperial ship only had four fighter bomber squadrons but that was plenty to take out the Rebels, next time I will give the Rebels some fighter support.
The other thing I realised is that the Defence tokens work really well when you make them ‘one use’
I have played a few times now and the tokens are good but when you can use them over and over again through the battle, I think they really unbalance the game.
They make it really hard to actually do any damage to the big ships, some ships have a better selection than others or different numbers of tokens which does make some ships better at surviving than others, but on the whole I think they are too strong when there is no limit on the number of times you can use them during a game.
I have played a few times using two big ships and I find it hard to actually do any damage on either ship because of the Defence Tokens and that is a little silly, but once you restrict the tokens down to one use only then it does really make you think about when you should use them rather than knowing that you have them in every turn.
Just as an example the Hammerhead used its Contain Token in one turn to stop a critical hit, this saved the ships engines when they were hit, but once it was used the ship would have to take any further critical hits it got, that I think works better than having the Contain Token available each turn.
I have never played Star Wars Armada so I am in no position to criticise the gameplay or anything like that, but I do struggle to see how the big ships take any damage in the game, I know they have different game mechanics with the different coloured dice etc. but I am struggling to see how it works… I will have to find a play through video on the internet to see how the fighting and the Defence Tokens work in the game.
I know that Stars & Lasers uses a different system for fighting so maybe that is the issue with the Armada Defence Tokens, I don’t know for sure at the moment, but hopefully I will be able to get a better understanding of things after more playtesting.
At least I am getting in a few games at the moment which is a bonus, and as I love spaceship gaming it’s no real hardship for me to play over and over again testing rules 😉
If you want to find out a little more about the Star Wars add-on or even the Stars & Lasers rules then come on over to the Little Wargaming Worlds Discord Server, you can also chat about your games of Stars & Lasers or any of my other games, the link is on the Community tab on this site.
I posted this comment on the Facebook starship miniatures group, but will repeat it here.
That was a good read. It sounds like the fire arc and manoeuvrability rules worked well, but perhaps the points and defence tokens need some tweaks. In a fuller game you would expect fighters on both sides so perhaps the domination of fighters in this play test wouldn’t be a problem in a bigger battle, worth thinking more about though.
There may be a few things affecting defence tokens to keep in mind. 1. In Star Wars Armada blue dice are “accuracy dice”. If in an attack they roll an accuracy symbol then they can choose a defence token of the target ship which can then not be used to defend. You could potentially model this by making any hit that exceeds the roll by x amount can stop a defence token being used.
2. The redirect token (moving shields from one arc to another) may be more effective in S&L because it is easier to replenish shields in S&L so more likely you will either have shields in place, or will be able to use redirect to bolster your shields. Also bigger ships have bigger shields, so a repair roll on these will give back more shields than repair rolls on smaller ships (creating a bigger imbalance between smaller and larger ships). In this case potentially making it harder in S&L to replenish shields may help. For example make it that you need to use a command to replenish, or that rolling for shields only replenishes some, not all shields.
3. Maybe more dice are generally rolled in attacks in Armada, which may make the defence tokens less effective.
Just some thoughts and your idea of making the defence tokens single use could be a way to correct the imbalance here.
Hi Craig,
The next few battles I have I will have fighters on both sides to see if that evens things up more, it should because it does in S&L normal games.
I do think the one use of the Defence Tokens will work well, but this is still the playtesting stage so we shall see.
The replenishing of the shields may be an issue because it is easier in S&L to get the shields back up ( well not when I roll the dice!!! ) but again this is something that will show up more if there is a problem as I playtest.
Cheers,
Mac
Hi Mac
Seems to me you the power balance right!
If you watch the movies its almost always the fighters that make the difference and the empire are always reluctant to deploy their ships into the thick of things.
Re defense token’s
Maybe if you link the number of defense token’s for each ship to the captain’s experience,
Also make the cost of rebel captain’s a lot cheaper.
If you think of it this way rebel captain’s are more likely to be battle hardened veterans due to the finite nature of the the fleet.
Whereas an empire captain is less likely to have experience with a tanashas enemy with a bit of gun boat diplomacy and patrolling the outer rim being the bulk of their experience.
Hi Zac,
I think that the power balance may not be 100%, although it is very close.
A small adjustment in the points may do the trick.
Even in S&L normal games the fighter bombers are very scary!! they can rip a big ship into tiny pieces with some lucky dice rolls… I know this because it has happened to my ships many times 🙁
Some good ideas about the linking of the Defence tokens to the Captains Experience, that is something that I will look at.
Thanks,
Mac
Hi Mac
What I ment about the power balance being right
Is a single star destroyer should be a match for 3 rebel ships on paper at least..
Hi Zac,
Ah ok, I will be playtesting this fight again but next time I will not take the fighters, that way it will be just the big ship against the three smaller ones.
That way I will get to see how they match up.
That is the fun thing about playtesting, you get to play lots and lots of games 😉
Mac