Yep billboards, these have been scratch built from plastic sheets, coffee stirrers and balsa wood with a few other little added extras to finish them off.
I have seen many post-apocalyptic gaming boards and a lot of them have billboards of one kind or another so I decided I would have some as well.
But what kind was I going to do, well I saw some that had been put together using balsa wood and plasti-card and thought they looked simple enough to make and all I would need to do was to adjust them slightly to make them my own design rather than a complete copy of someone else’s work.
A friend gave me some hard-plastic sheets cut up into oblong pieces a while back and I have been using them to base up my figures and scenery since.
And looking at them I thought that they would be a perfect size for what I wanted without any need to cut them. I would use one for the base and one for the billboard itself. The main decision for the size was I didn’t fancy cutting the pieces as they are really tough, and it is hard to cut by hand… I was too lazy to get my hobby drill out and the cutting blades.
Any way now I had the perfect size pieces! I started with the planking…
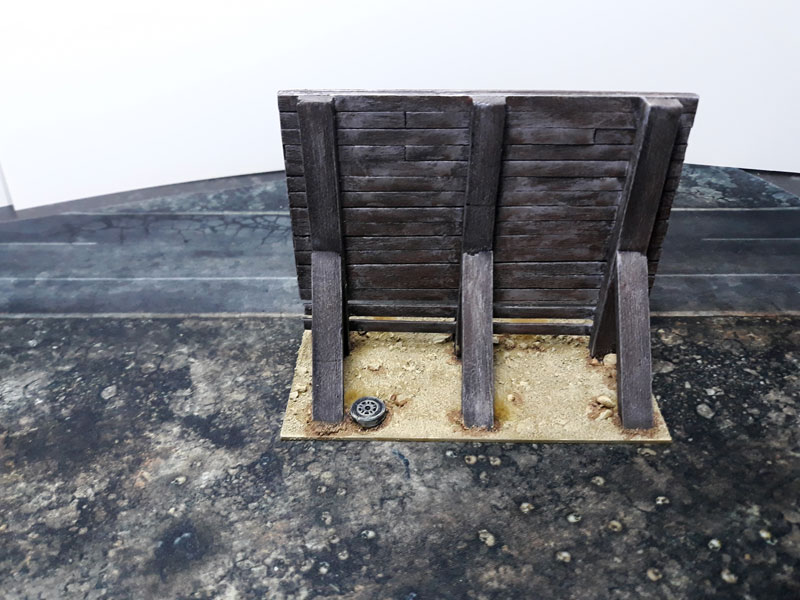
I first of all cut up loads of coffee stirrers to make the planking for the back of the billboard and for the surround, this was a little tedious but I wanted to make them look like wood rather than some sort of metal or something else.
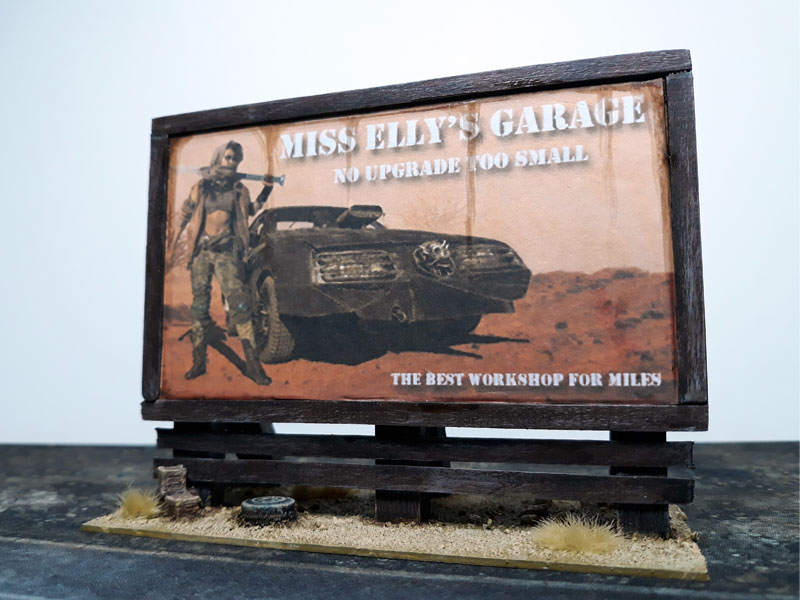
Once the surround was on it gave me the size of the poster that I could use, so I went for a little hunt on the internet and found two and quickly went about changing them slightly, again I didn’t want to have just a straight copy of someone else’s work.
The third one was one of my own pictures and fits in with my new rules set.
Once all the coffee stirrers were stuck down to the three billboards, I then cut three main legs for each of them from balsa wood, I then cut three small props out of the same balsa wood to help hold the billboards upright.
The next job was to stick them all on their bases and again I used the hard plastic card for the bases.
While this was drying I went back to adjusting the posters, when I was happy with them I stuck them on the billboards inside their frames.


When the poster and all the boarding was dry I then painted the billboards with black primer, then I painted all the wood areas with beasty brown.
The next thing I did was to weather them so they looked old and weather beaten.

This I did by hitting the wooden parts with a light dry brush of a light grey just to try and give the wood an old dusty look, although after this was done I did hit lots of the wooden surfaces with a desert wash which made it look even more dusty.
I was happy with two of the posters but my one I felt had to many stains on it, so I reprinted the poster and started again.
All I did for the weathering of the posters was to run down small amounts of Soft Tone from the top edge with a fine brush then.
Not 100% sure if this is how the posters would have weathered but for me they look ok and are very usable on my wasteland table.
Then I stuck a few odd bits on the bases, things like a couple of wheels, some boxes / crates, a seat which I cut from an old matchbox car and a small pile of 3D printed tyres.
Once this was all stuck I added some fine sand and some “gravelly” sand to give the bases a little texture using PVA glue.


The bases were then primed with a dark yellow primer, and once this was dry I hit them again with a dry-brush using a light buff colour.


The last couple of finishing touches I added was to use the Soft Tone again to just shade around the tyres, boxes and posts and then I added a few desert / dry tufts and that was that.


I think they look fairly good and will definitely be using them on my wasteland tables in my games.
They look great!
Thanks, they were surprisingly easy to make and will make good scenery for my games.
Mac